Charming Corner Border: A Designer’s Review for Personalized Gifts
As an embroidery designer who works daily with small shop owners and gift creators, I test every machine embroidery design with a real customer in mind. This week, I stitched out the Charming Corner Border several times, imagining how it would live on a finished product headed to a baby shower, a wedding, or a cozy kitchen. It’s a design that doesn’t scream for attention, yet it changes everything it touches. In this review, I’ll walk you through exactly how it performs, which personalized gifts it suits best, and where you need to pause before stitching.
First Impressions: A Delicate Corner with Big Personality
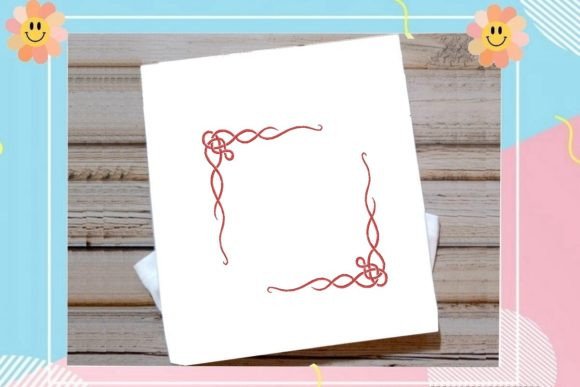
The moment I opened the embroidery file, I could see the designer’s intent. Charming Corner Border is a classic corner accent with a gentle, flowing rhythm. It’s not overly ornate, but it carries a soft, romantic charm that feels both timeless and fresh. The centerpiece of the design is a graceful, slightly organic motif—think gentle curves, tiny leaves, and a whisper of a floral touch. It strikes a balance between sweet and elegant, leaning more toward heirloom quality than playful novelty. This makes it a wonderful fit for personalized gifts where the emotion needs to shine through the stitching.
On my test fabric, the detail level was impressive for a corner border. The small elements held their shape without distorting, and the stitch density felt balanced—not too heavy for delicate linens, yet substantial enough to catch the light beautifully. I tested it in a soft ivory thread first, then in a muted sage, and both brought out that charming, handmade feel that buyers on Etsy and at craft fairs adore.
Ideal Personalized Gifts for the Charming Corner Border
If you’re asking, “What would I actually make with this?”—the answer is almost everything where a corner detail elevates the whole piece. Here are the products I’d confidently add to my shop lineup using this design:
- Baby blankets and nursery items: A single corner with the baby’s name or a tiny birthdate inside creates a gorgeous keepsake. The design’s softness suits baby embroidery perfectly.
- Wedding gifts and anniversary keepsakes: Imagine a linen pillow cover with the couple’s initials framed by this corner border. It adds immediate heirloom value.
- Kitchen towels and aprons: Stitch it in a contrasting thread on a flour sack towel, and you’ve got a gift that feels both personal and premium. The corner format works especially well because it leaves the center free for a monogram or a short message.
- Custom tote bags and zipper pouches: For everyday carry, this border adds a touch of beauty without being too fragile. It’s a fast way to turn a plain canvas bag into a handmade product that sells.
- Nursery decor and wall hangings: Paired with a family name or a sweet quote, a framed corner border can transform fabric into a ready-to-hang gift.
As a digital product seller, you can also use this design to create printable mockups that show customers exactly how their personalized gift will look. The corner format previews beautifully on a flat-lay image, making it easier to sell custom orders before a single stitch is sewn.
Using the Design with Care: What to Avoid
Even a charming design like this has its limits. Because it’s a detailed corner border, certain surfaces and situations can undermine its beauty. I learned a few things during my test runs that I’d flag for any maker:
- Small lettering inside the border: If you’re planning to add a name or date within the corner, keep the text simple and avoid tiny, overly delicate fonts. The border’s own details can compete with micro-lettering, especially on textured fabrics.
- Thick, fluffy towels: While the design works on a smooth kitchen towel, a high-pile bath towel may swallow the finer curves. In that case, use a heavy water-soluble topper to keep the stitches crisp.
- Stretchy baby clothes: Onesies and knit fabrics can distort the border’s shape if not stabilized aggressively. I’d save this design for wovens, quilts, or flat cotton items rather than stretchy garments.
- Dark, absorbent fabrics: I tried a deep navy cotton, and the delicate details lost some definition, especially with a light thread. High contrast is essential—test your thread color carefully on a scrap of the exact fabric you’ll sell.
- Curved seams and tight corners: The design is meant to nestle into a square corner. If you’re placing it on a rounded bib or a contoured item, the alignment may feel off. Stick to items with clear, crisp corners.
- Frequent, heavy washing: While the stitch density held up well, any embroidery with fine details benefits from a gentle wash cycle. If you’re selling a blanket meant for daily use, recommend a mesh laundry bag to your customers.
How a Corner Border Elevates Giftability and Trust
From a seller’s perspective, the Charming Corner Border is a quiet workhorse. It makes a personalized gift feel more finished, more intentional. When a customer opens a package and sees a corner decorated with this design, the perceived value jumps. They’re not just holding a towel with a name—they’re holding a thoughtfully composed piece of handmade art.
I’ve noticed that corner borders increase emotional connection. They frame the personalization, literally drawing the eye to the name or date. On a wedding pillow, this creates a focal point that feels like a professional keepsake. For baby embroidery, it turns a simple blanket into a future family treasure. The design’s gentle, classic character also builds trust because it doesn’t look trendy or mass-produced. It signals that the maker cared about every detail, which is exactly what encourages repeat orders and glowing reviews.
For product photography, the Charming Corner Border is a dream. The asymmetric placement adds visual interest to flat-lay shots, and the delicate lines photograph well even in natural light. I’d recommend using a thread color that contrasts enough to be visible in a thumbnail, as that’s what stops a browsing shopper on Etsy. A soft gold on cream linen, for instance, reads beautifully.
Practical Embroidery Tips from My Test Run
Before you add this digital embroidery file to your shop’s permanent collection, here are the steps I follow anytime I’m testing a new corner border for customer orders:
- Test on scrap fabric first. I always run a stitch-out on the same material I’ll use for the final product. This reveals any tension issues or fabric distortion before it’s too late.
- Check thread color contrast. Hold the test piece under different lighting. A design this delicate can disappear on certain fabrics if the thread blends too much.
- Confirm your hoop size. While the product description doesn’t specify exact dimensions, I measured the stitched area and made sure it fit comfortably within my most common hoop. Always measure before you commit to a layout.
- Review stitch density. The design felt well-digitized, with no overly dense areas that could cause puckering on fine linens. Still, a quick check on your own machine is wise.
- Use the right stabilizer. For towels and linens, a medium-weight cutaway stabilizer gave me the best results. For delicate fabrics, a tear-away with a layer of wash-away topping kept the stitching crisp and tidy.
- Compare light and dark fabric mockups. I stitched it on white and on a warm gray. The character changed, but both looked lovely. Just know that the finer details may need a slightly bolder thread on darker backgrounds.
- Inspect small details after stitching. Use a magnifying glass or your phone camera to zoom in. The tiny leaf points and curve endings should be clean. If any thread trims are needed, do them carefully so the design remains gift-ready.
- Confirm commercial licensing before selling finished products. The product details don’t explicitly state the license terms, so I’d reach out to the digitizer or platform to verify that you can sell physical items made with this design. This step protects your small business and your reputation.
Who Will Love This Design in Your Shop
After working with the Charming Corner Border, I can picture the exact type of customer who will fall for it. It’s the person shopping for a baby shower gift that feels personal but not overly cutesy. It’s the bride looking for a custom wedding handkerchief for her mother. It’s the Etsy seller who wants to offer a “signature” corner option that makes every order feel cohesive. And it’s the craft fair maker who wants to add a touch of elegance to kitchen towels without spending hours on each piece.
Because the design is a corner border, it pairs beautifully with so many other embroidery elements. You can combine it with a script font for a monogram, or use it alone to frame a blank space where the customer can later add their own detail. That versatility makes it a smart addition to your library of machine embroidery designs, especially if you cater to the personalized gift market.
If your shop leans toward classic, romantic, or heirloom-style products, the Charming Corner Border will feel like it was made for you. It’s a design that rewards careful stitching and thoughtful placement, and it helps your finished product tell a story of love and intention. That’s the kind of magic that turns a simple fabric item into a gift someone will keep for decades.